Whip Up Childhood Joy: Nostalgic PB&J Thumbprint Cookies in Under 30 Mins
In the whirlwind of daily life, finding moments of simple joy and connection can feel like a quest. As busy parents, home bakers, or anyone craving a taste of yesteryear, we often seek treats that are both easy to make and deeply comforting. Enter the star of our kitchen today: Nostalgic PB&J Thumbprint Cookies. These delightful little bites are more than just a dessert; they’re a warm embrace of childhood memories, crafted to bring smiles and satisfy sweet cravings – all in under 30 minutes!
Imagine the creamy, nutty embrace of peanut butter perfectly paired with the sweet, fruity burst of jelly, reminiscent of those classic school lunch sandwiches. Now, picture that iconic flavor combination in a soft, chewy cookie that melts in your mouth. That’s precisely what these easy pbj thumbprint cookies deliver. They are an absolute dream for any busy kitchen, promising a quick, fuss-free baking experience without sacrificing an ounce of flavor or charm. Get ready to create some sweet, new memories while reliving cherished old ones!
Why PB&J Thumbprint Cookies Are a Kitchen Win for Busy Families
When time is a precious commodity, a recipe that promises delicious results in less than half an hour is nothing short of a culinary triumph. Our nostalgic pbj thumbprint cookies stand out for several compelling reasons, making them an undisputed champion in the realm of quick, family-friendly treats:
- Unbeatable Speed: From mixing bowl to cooling rack, these cookies require less than 30 minutes. This incredible efficiency is largely due to a straightforward ingredient list and, crucially, a dough that requires absolutely no chilling time. This means instant gratification and less waiting for those eager little hands (and big ones!). For more speedy baking insights, check out our Quick PB&J Thumbprint Cookies: Classic Flavor, No-Chill Recipe.
- Effortless Simplicity: You don't need to be a gourmet baker to master these cookies. The steps are intuitive, making them a fantastic recipe to involve children in – from measuring ingredients to pressing their very own "thumbprints" into the dough.
- A Burst of Nostalgia: The universal appeal of a peanut butter and jelly sandwich is undeniable. These cookies cleverly transform that beloved combination into a bite-sized treat, instantly transporting you back to simpler times. Each cookie offers that perfect balance of salty, sweet, and fruity notes, evoking warmth and comfort with every chew.
- Satisfying & Versatile: Whether it’s an after-school snack, a quick dessert for a weeknight dinner, or a sweet addition to a lunchbox, these pbj thumbprint cookies fit every occasion. They're hearty enough to satisfy a craving but light enough not to feel overly indulgent.
- Minimal Cleanup: With simple ingredients and a streamlined process, cleanup is remarkably quick, letting you savor the moments of enjoyment rather than dreading the aftermath.
These cookies aren't just about satisfying a sweet tooth; they're about creating those small, sweet moments at home that become cherished family memories. The joy of warm, gooey cookies fresh from the oven, shared with loved ones, is truly priceless.
The Anatomy of a Perfect PB&J Thumbprint Cookie: Essential Ingredients
The magic of these pbj thumbprint cookies lies in a handful of simple, readily available ingredients that, when combined, create an explosion of flavor and texture. Understanding the role of each component is key to achieving that perfect balance of chewy, rich, and fruity goodness.
- Unsalted Butter: The foundation of our cookie, butter adds incredible richness and creaminess. Opting for unsalted butter gives you control over the overall saltiness of the cookie, allowing other flavors to shine. It contributes to the soft, tender texture that makes these cookies so irresistible.
- Granulated Sugar: This classic sweetener not only provides sweetness but also contributes to the delicate crispness on the outside edges of the cookie. It works in harmony with brown sugar to achieve a balanced sweetness.
- Brown Sugar: The unsung hero for chewiness and depth! Brown sugar, with its inherent molasses content, adds moisture to the dough, ensuring a wonderfully chewy interior. It also imparts subtle caramel notes that complement the peanut butter beautifully.
- Salt: Don't underestimate the power of a pinch of salt. It acts as a crucial flavor enhancer, balancing the sweetness and intensifying the savory notes of the peanut butter, bringing all the flavors into perfect harmony.
- Creamy Peanut Butter: The undeniable star! Creamy peanut butter provides that iconic, nutty flavor and a wonderfully smooth texture. While creamy is recommended for consistency, you can experiment with crunchy for added texture. Pro Tip: If using natural peanut butter, stir it very well to incorporate any separated oils for a consistent dough.
- Egg: The binder that holds everything together. The egg provides structure, moisture, and richness, ensuring the cookies hold their shape while remaining wonderfully soft and chewy.
- Vanilla Extract: A splash of good quality vanilla extract adds a layer of warmth, depth, and aromatic complexity that elevates the overall flavor profile. It's often the secret ingredient that makes a good cookie great.
- All-Purpose Flour: The structural backbone of the cookie. All-purpose flour provides the necessary framework for a soft, tender texture. Ensure you measure it correctly – lightly spooning it into your measuring cup and leveling it off – to avoid dense or dry cookies.
- Baking Soda: This leavening agent is responsible for the slight rise and tender crumb of the cookies. It reacts with the acidic components in the dough (like brown sugar or even traces in peanut butter) to create a soft, slightly fluffy bite.
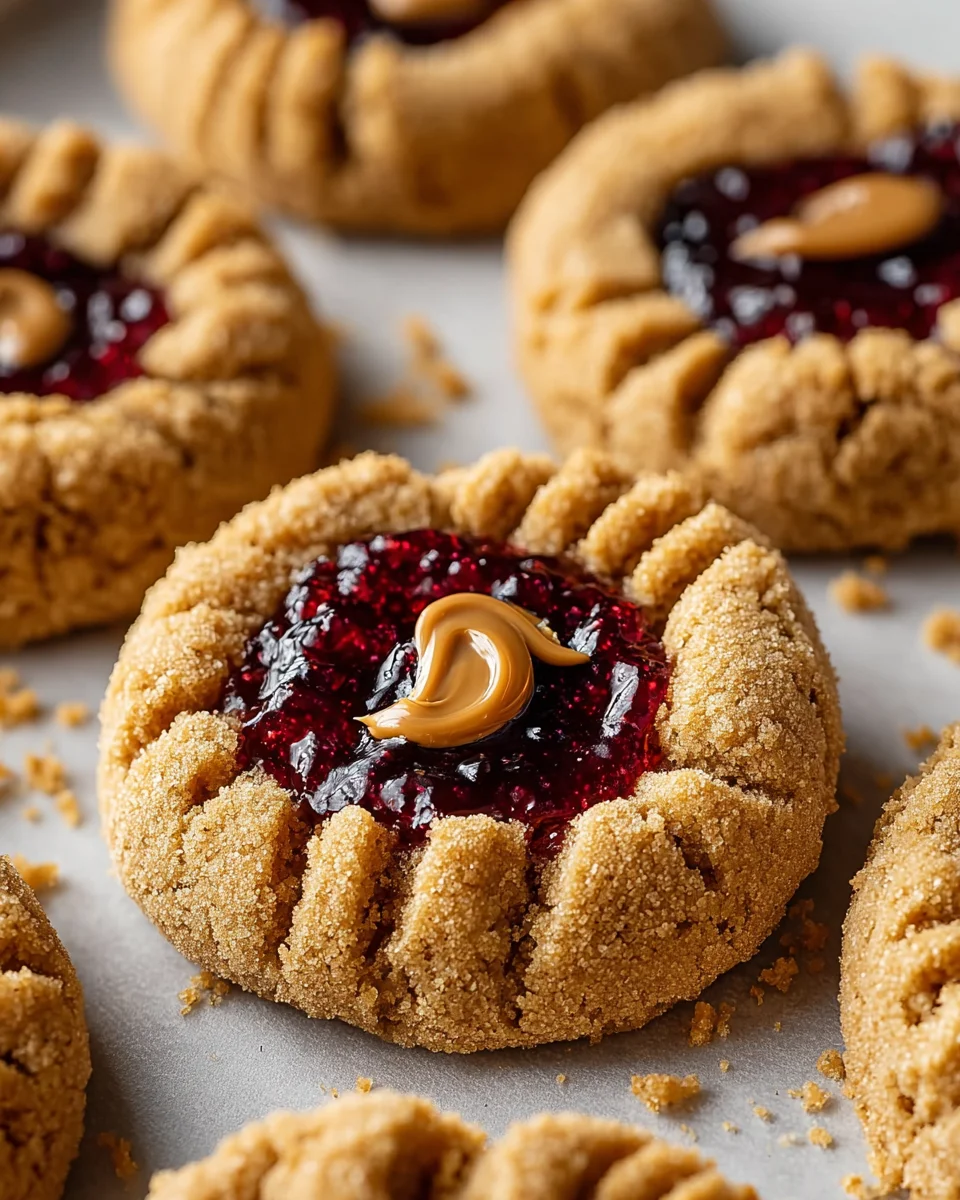
- Jelly or Jam: The fruity burst in the center! Grape jelly offers classic nostalgia, strawberry jam brings a sweeter, slightly chunkier texture, and raspberry jam provides a delightful tart counterpoint. Feel free to experiment with your favorites! For more ways to customize, see our Perfect PB&J Thumbprint Cookies: Chewy, Customizable & Kid-Friendly article.
- Melted Peanut Butter (for drizzling): An optional but highly recommended flourish! A drizzle of melted peanut butter adds an extra layer of nutty flavor and a beautiful visual appeal, making your cookies look as good as they taste.
Whipping Up Childhood Memories: A Step-by-Step Guide
Creating these delightful pbj thumbprint cookies is a joyful journey that’s as fun as it is simple. With just a few straightforward steps, you'll be enjoying warm, gooey cookies that everyone will adore. Let's get baking!
Step 1: Preheat and Prepare
First things first, preheat your oven to 350°F (175°C). A properly preheated oven ensures even baking from the moment your cookies enter. While your oven warms up, line your baking sheets with parchment paper. This vital step prevents sticking and makes for easy cleanup.
Step 2: Cream the Wet Ingredients
In a large mixing bowl, combine the unsalted butter, granulated sugar, brown sugar, and salt. Using an electric mixer (handheld or stand mixer) on medium speed, cream these ingredients together until the mixture is light, fluffy, and pale in color. This creaming process incorporates air, which contributes to the cookies' soft texture.
Step 3: Add Peanut Butter, Egg, and Vanilla
Next, beat in the creamy peanut butter until fully incorporated. Then, add the egg and vanilla extract, mixing until just combined. Be careful not to overmix at this stage.
Step 4: Incorporate Dry Ingredients
In a separate bowl, whisk together the all-purpose flour and baking soda. Gradually add this dry mixture to the wet ingredients, mixing on low speed until just combined. Stop mixing as soon as no streaks of flour remain to avoid developing too much gluten, which can lead to tough cookies.
Step 5: Form and Thumbprint
Scoop the dough into 1-inch balls (a cookie scoop works wonders for consistency) and place them about 2 inches apart on your prepared baking sheets. Using your thumb (or the back of a small measuring spoon), gently press an indentation into the center of each cookie ball. Be sure not to press all the way through.
Step 6: Fill with Jelly and Bake
Spoon about ½ teaspoon of your chosen jelly or jam into the thumbprint of each cookie. Once filled, transfer the baking sheets to the preheated oven. Bake for 8-10 minutes, or until the edges are lightly golden brown and the centers are just set. The jelly may bubble, which is perfectly normal.
Step 7: Cool and Drizzle (Optional)
Once baked, remove the cookies from the oven and let them cool on the baking sheet for a few minutes before transferring them to a wire rack to cool completely. While cooling, gently melt about 2 tablespoons of peanut butter (a microwave works great for this, in 15-second intervals). Once the cookies have cooled, drizzle the melted peanut butter over them for an extra layer of flavor and visual appeal.
Tips for PB&J Thumbprint Cookie Perfection & Beyond
While the recipe itself is straightforward, a few extra tips can elevate your pbj thumbprint cookies from great to absolutely unforgettable:
- Peanut Butter Choice: For the most consistent results, a conventional creamy peanut butter (like Jif or Skippy) works best. If using natural peanut butter, ensure it's well-stirred, as the oil separation can affect dough consistency.
- Jelly Customization: Don't limit yourself to grape or strawberry! Try apricot, cherry, fig, or even a citrus marmalade for a gourmet twist. Just be mindful of very runny jellies, as they can spread more during baking.
- Preventing Spreading: If your cookies tend to spread too much, ensure your butter isn't too warm when you start creaming. Also, precisely measuring your flour is crucial. If humidity is high, you might add an extra tablespoon of flour.
- Deeper Thumbprints: If your thumbprints fill in too much during baking, gently re-press them with the back of a spoon immediately after removing them from the oven while they are still warm and soft.
- Kid-Friendly Involvement: This recipe is perfect for little helpers! Let them help measure, roll the dough into balls, or make the thumbprints. It’s a fantastic way to introduce them to the joys of baking.
- Storage: Store your cooled pbj thumbprint cookies in an airtight container at room temperature for up to 3-4 days. They also freeze beautifully for up to 2 months. Simply thaw at room temperature before serving.
- Serving Suggestions: These cookies are divine on their own, but they pair wonderfully with a cold glass of milk, a cup of coffee or tea, or as a delightful addition to a dessert platter.
Conclusion
These Nostalgic PB&J Thumbprint Cookies are more than just an easy recipe; they're a ticket to happy memories, a testament to the power of simple ingredients, and a reminder that deliciousness doesn't have to be complicated. In under 30 minutes, you can transform pantry staples into a batch of warm, comforting cookies that will delight everyone in your family. So, next time you're craving a taste of childhood or a quick, satisfying treat, roll up your sleeves and whip up these irresistible pbj thumbprint cookies. Your taste buds, and your family, will thank you!
